How to create a simple Microsoft Dynamics Power App connected to Excel - Introduction to Power Apps
- Drew Clark

- Jan 24, 2020
- 5 min read
Updated: Jan 27, 2020
Learn how to create an app for you organization with a drag and drop interface. No development experience necessary. Using Power Apps shortens the business application development life cycle and empowers users to create native, mobile, and web apps.
Part 1 - Create App
We are going to create an app for employees requesting time off.
Go to powerapps.microsoft.com and sign in with your Microsoft account.
From the Home screen, select "Canvas app from blank", see the image below.

Name the App "Time Off Requests", select Phone from the format selection and click Create in the bottom right corner.

Select Skip on the next window.

Part 2 - Create Excel File with sample data for app
Minimize your power app, and create an excel doc with 3 example employees like the table below. Make sure that the data is converted into a table and your columns have names.

Save that file in your OneDrive or OneDrive for Business. CLOSE THE FILE AFTER YOU SAVE!! It will not work if you leave it open.

Part 3 - Connect Excel File to App
Navigate back to your power app, and select Data Sources from the menu on the left. Type in OneDrive in the search box. Choose which ever one you saved the excel file in.

Select the excel file you created earlier.

Select your table, there should be a default table name from excel.

Part 4 - Insert a List to hold our records
Click the Insert tab in the top left corner of the power apps window. Click the New Screen drop down, below insert, and select List. An example list will load, lets connect our excel data to it.

Select Tree View from the menu on the left. Delete Screen1 by clicking the three dots to the right of it. Select delete from the pop up menu.

Select Screen 2, Click on the [Title] of your list, change the title to "Time Off Requests"

Select RectQuickActionBar from the tree view. It will most likely be at the bottom. Click on properties on the right side of the window. Change the color to something else, I chose red.

Part 5 - Connect Data to List of Requests
Click on BrowseGallery1 from the Tree View. A window may appear asking to pick your data table, if so, click on Table1. If a window does not appear, navigate to the right side of the screen. Select the properties tab and click on Data Source. Set the Data Source to Table1. If the Data source shows a formula/function symbol and will not let you change it, go to the formula box above and delete the contents of the formula, then you will able to select Table1 from the Data Source drop down.

You should see your data from the excel table in the app, if you don't, you need to close the excel file and refresh the data source. To do that click on Data Sources on the far left. Click the three dots to the right of the Table 1 and select refresh.
Stay in the properties menu for BrowseGallery1 from the step above, select Layout, and change it to Title, subtitle, and body. Notice how this changes the layout of the app.

Click Edit next to fields and above the layout selection. Change subtitle to status, play around with the other options and see how this affects the app. This is how you set the title, subtitle, and body to equal different data items from your excel file. Close the Data window.

Part 6 - Insert Form for Requests
Select Insert in the top left corner of the window. Select the New Screen drop down and choose Form.

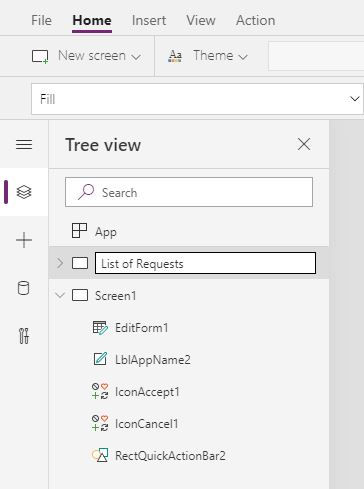
Change the Screen names to make more sense. Double click Screen2 in the Tree View and change it to List of Requests.

Double click Screen1 and change it to Request Form

Part 7 - Connect Form to Data & Add Fields
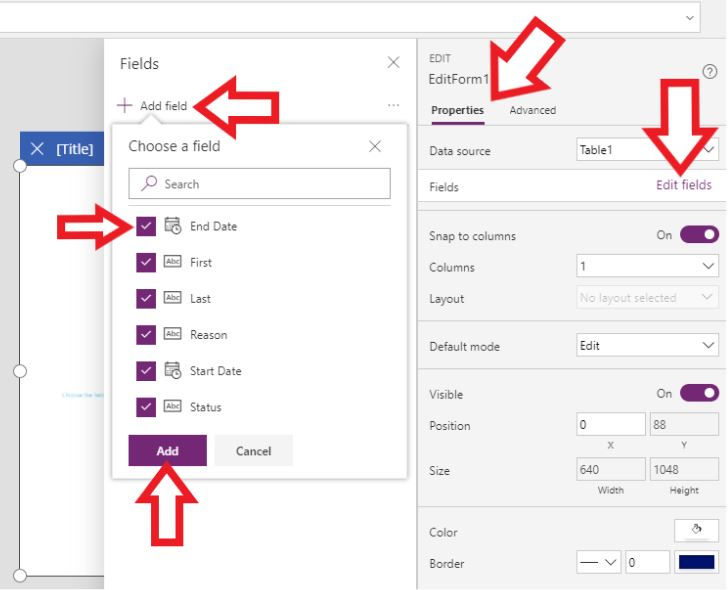
Select EditForm1 from the Tree View. Under the properties tab, click the drop down next to Data Source. Choose Table1, this is the same table used for the List of Requests.

Within the same properties tab, choose Edit Fields below the Data Source selection. Click Add Field on the window that pops out. Check off every field and click Add.

In the same Fields editing window, rearrange the fields by dragging and dropping them. I am placing mine in the same order as the excel sheet. First, Last, Status, Start Date, End Date, Reason.

Close the fields window and click the drop down next to Layout. Change the layout to Horizontal.

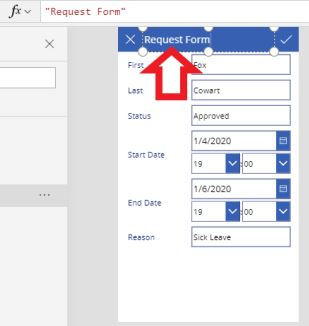
Click on Request Form from the Tree View, double click on the title and change it to Request Form. Do not worry about your data not filling out yet. That happens in the next part.

Part 8 - Connect Fields to Data
EditForm1 should still be selected. On the left side of the screen, select the drop down next to Data Source. Choose Item from the list.

Type or paste BrowseGallery1.Selected in the formula bar to the right of the equals sign. This is going to connect this form's fields to our data. You should see the field's fill in after you press enter or click outside of the formula bar.

Part 9 - Connect Button to Actions
Select List of Requests from the Tree View. Select NextArrow5 under BrowseGallery1. Click Action at the top of the screen.

Click the drop down next to Navigate near the top left of the window. Select Request Form. Click Request Form even if it has already been selected. This will allow the user to press the arrow button and be directed to the associated Request Form.

Select Request Form from the Tree View. Click on IconCancel1 under Request Form. Type or paste ResetForm(EditForm1); Back() into the formula bar and press enter. This will allow the X button to take you back to the List of Requests.

Select List of Requests from the Tree View, then click on IconNewItem1. Type or paste NewForm(EditForm1); Navigate('Request Form', None) into the formula bar.

Click on IconAccept1 in the Tree View and change the formula to equal SubmitForm(EditForm1); Back() This will allow the check box to save the record and then return you to your list of requests.

Part 10 - Test your App!
Your App is ready to test! Click on List of Requests in the Tree View, then click on the play button in the top right corner. Try adding a new record by using the plus button. Save that record by pressing the check box. Navigate to existing record using the arrow button. Update records and press the check box. Continue on to save and share.

Part 11 - Save and Share your app
Click file in the top left corner. Click Save As, name your app, and click Save in the bottom right hand corner. Notice that you save this app to your computer or straight to the cloud.

Click Share after the app has finished saving or click Share in the file menu on the left side of the window. You will be redirected to a window where you can type in emails or names of coworkers.

Part 12 - Making changes and publishing those changes
I am going to make a quick change to the Request Form Title.

Click on File in the top left corner and select Save.

After it has saved, you will see an option to Publish. Click Publish, a new window will appear, click "Publish this version"


Comments